Unleash Your Creativity: A Step-by-Step Guide To Drawing An Adorable Bunny
Are you ready to unleash your inner artist and bring a smile to your face with a delightful drawing? Look no further! Drawing an adorable bunny can be a fun and rewarding experience, and with this step-by-step guide, you'll be hopping your way to creativity in no time. Whether you're a seasoned artist or a beginner, this guide will walk you through the process of creating a charming and endearing bunny that will make everyone around you go "awww."
As an expert in the field of digital marketing and SEO, I can assure you that drawing an adorable bunny is not just about following a set of instructions – it's about having fun and being creative. In today's digital age, there's no better way to express yourself and tap into your imagination than through art. And, who knows, you might just discover a new passion!
So, grab your pencils, markers, or digital drawing tools, and let's get started on this delightful journey to creating an adorable bunny.
Gathering Materials and Setting Up
Before we begin our creative adventure, let's make sure we have everything we need. Here are the materials and tools you'll require:
- Paper or a digital drawing tool (such as a graphics tablet or a drawing app)
- Pencils, markers, or other drawing instruments
- Eraser and sharpener (for your pencils)
- Reference images (optional, but recommended)
Having the right materials and tools will help you get started on the right foot. Choose a paper or digital drawing tool that feels comfortable for you, and don't be afraid to experiment with different drawing instruments to find what works best for your style.
Choosing Your Bunny's Size and Scale
When it comes to drawing an adorable bunny, the size and scale of your drawing can greatly impact its charm. Here are a few things to consider when deciding on the size and scale of your bunny:
- If you want your bunny to be a small, playful character, go for a smaller size and more detailed features.
- If you prefer a more cartoonish or stylized look, you can opt for a larger size and simpler features.
- If you're drawing an especially adorable bunny, consider making it larger and more expressive.
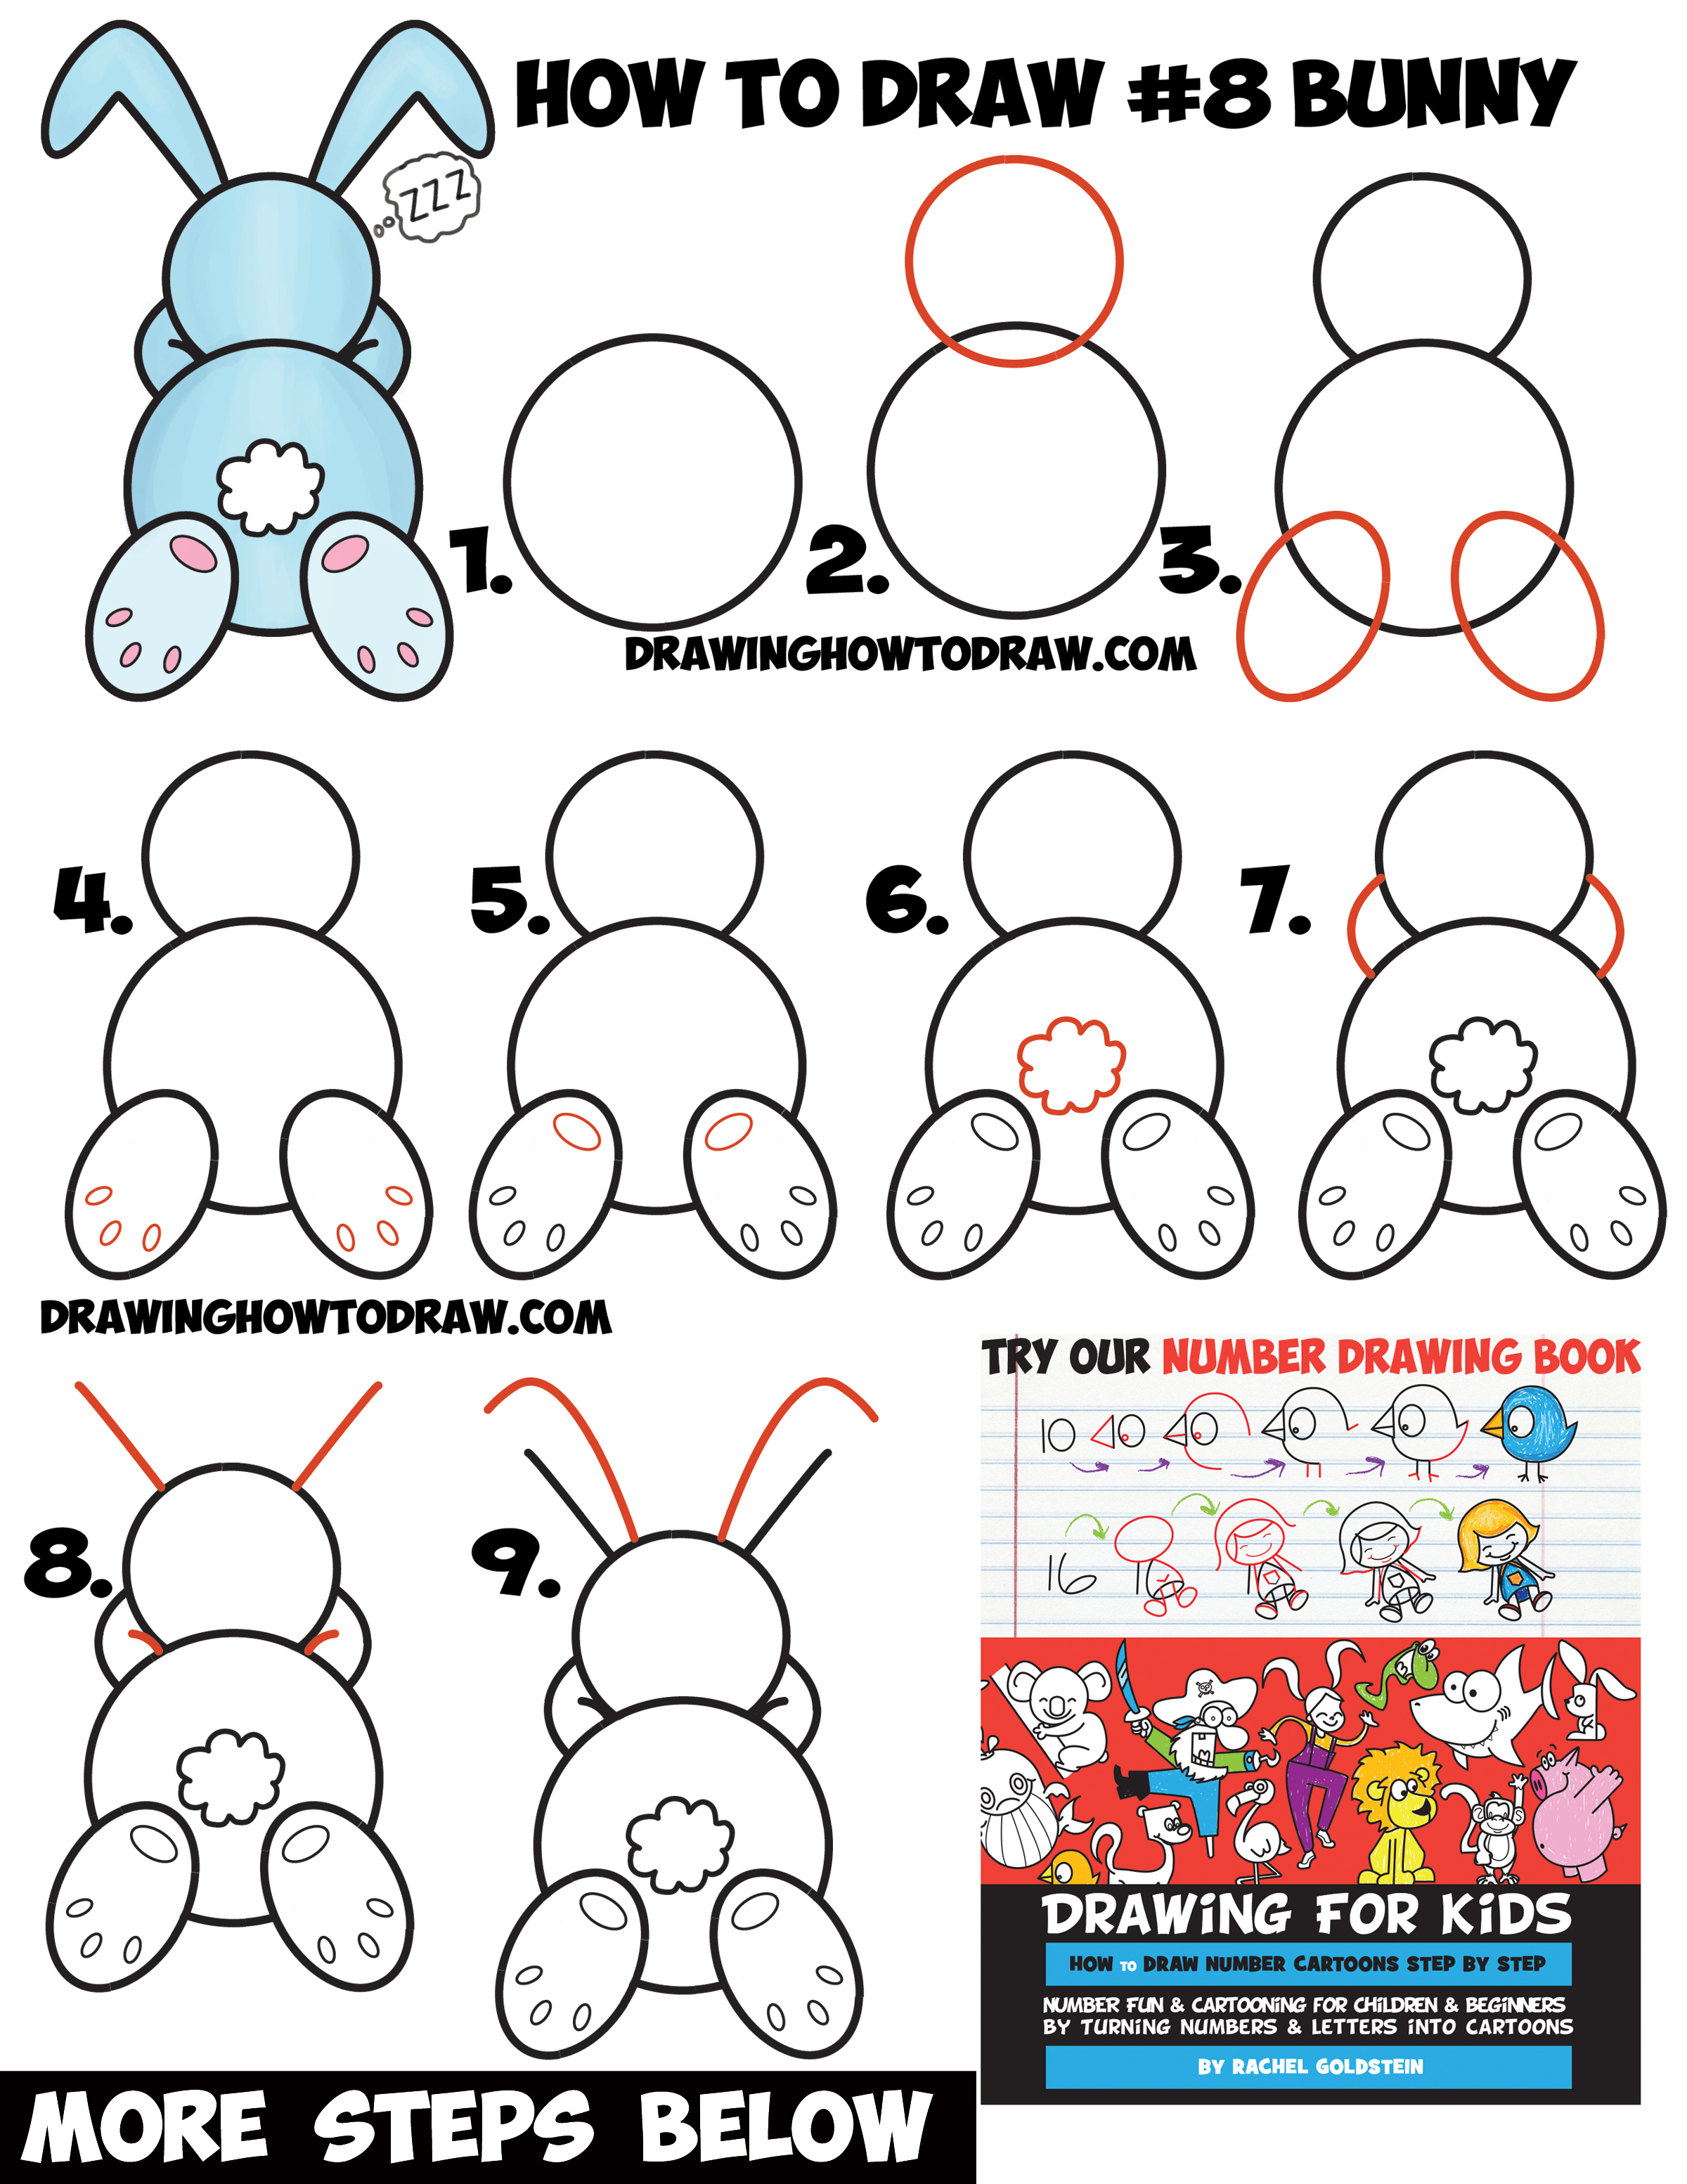
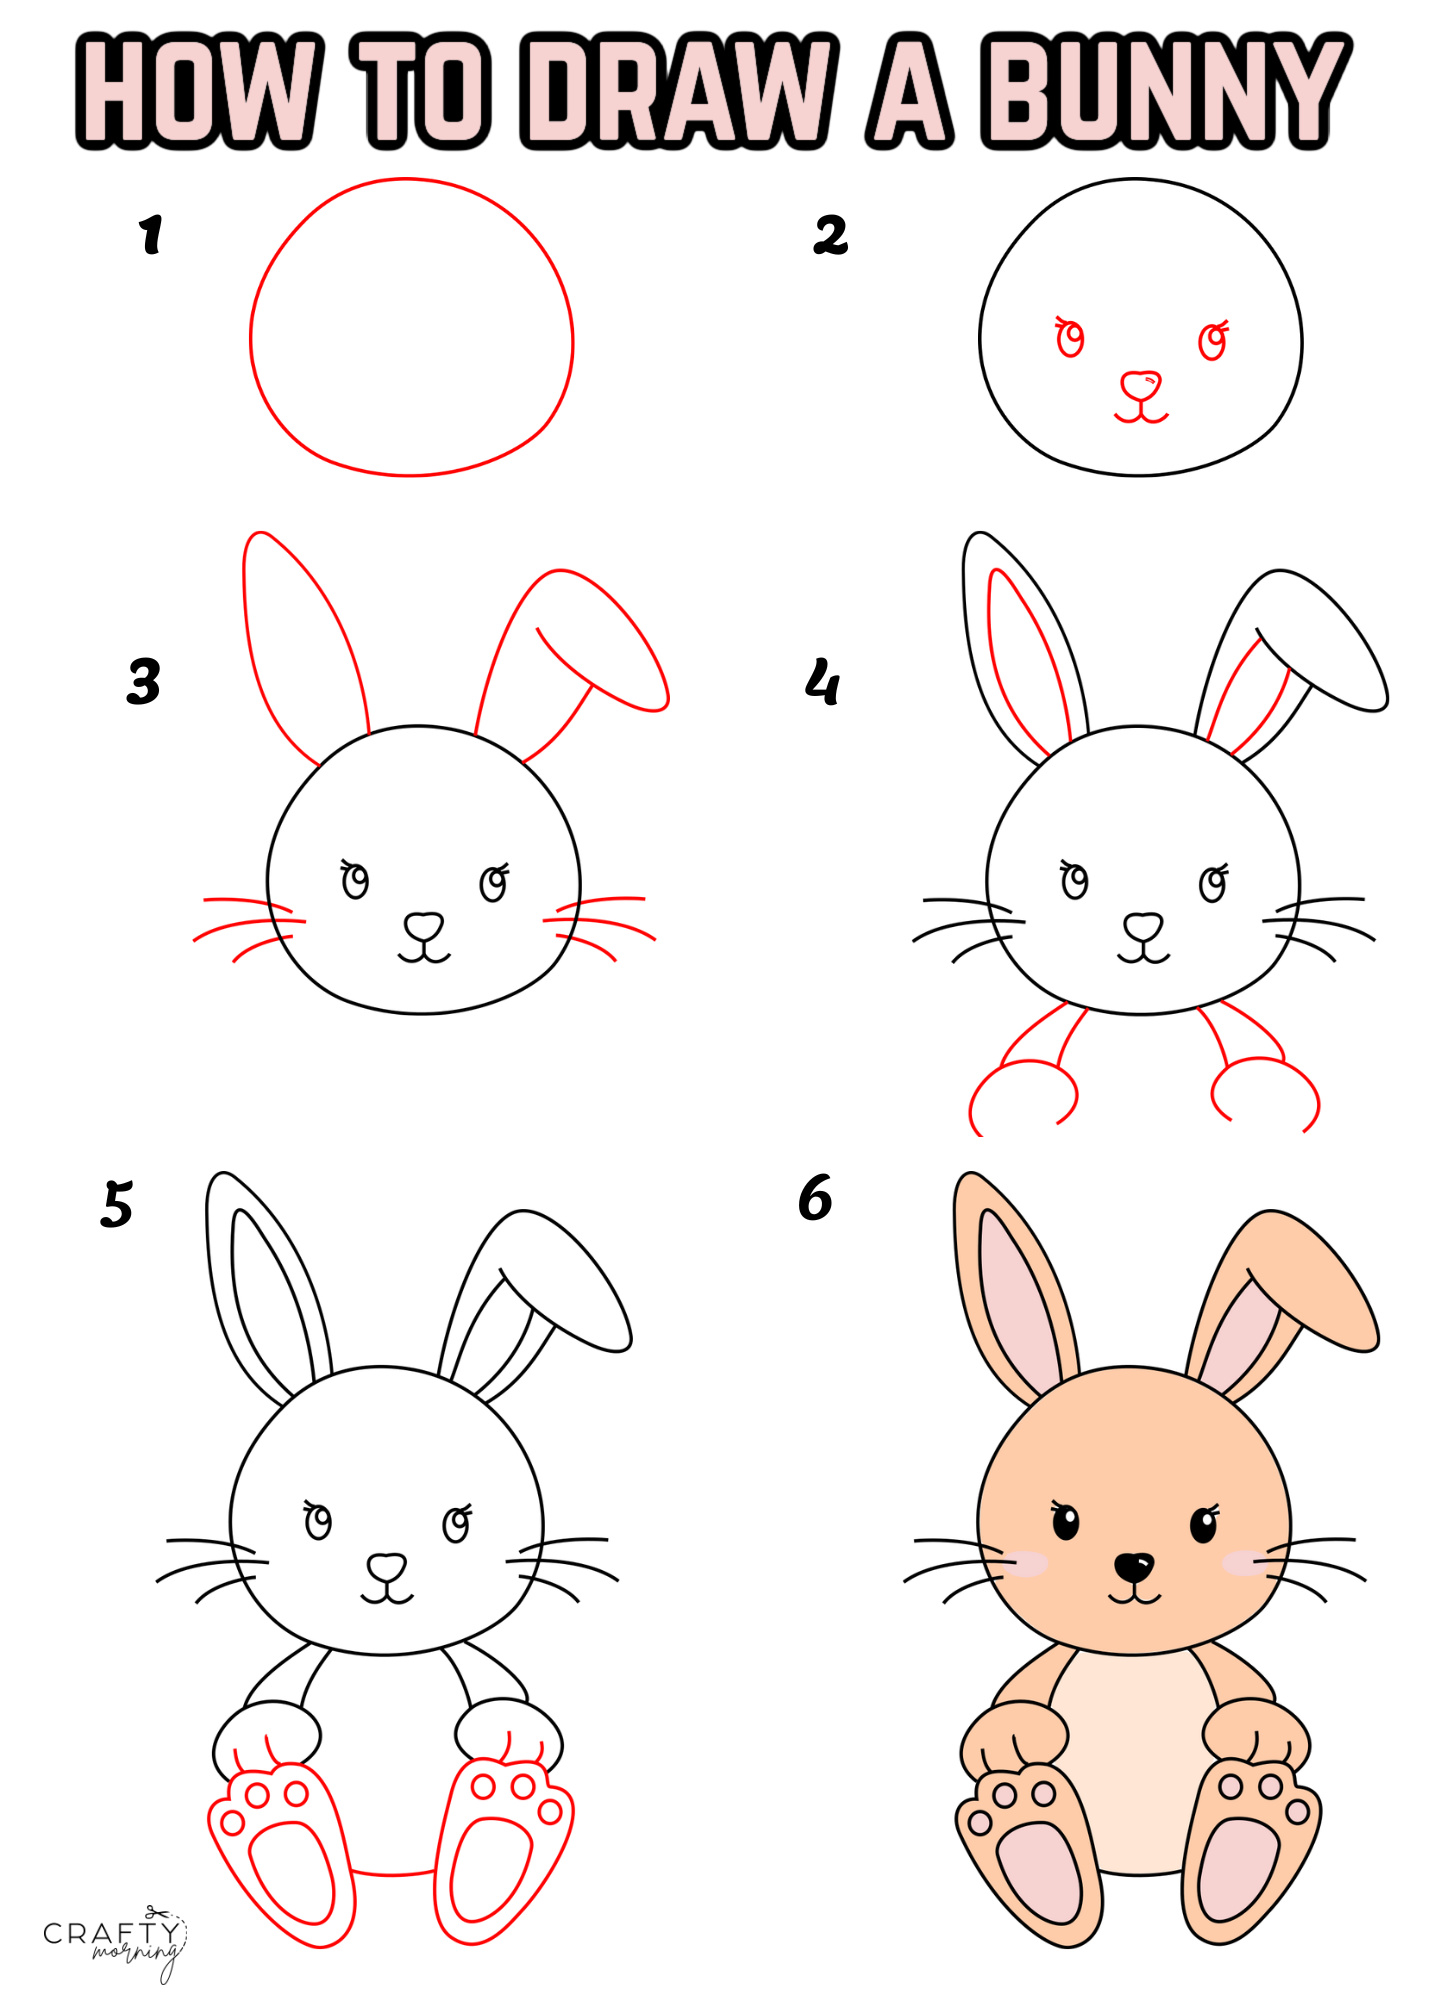
Step 1: Sketching the Basic Shape
Now that we have our materials and setting up, let's start with the basic shape of our bunny. Here's a simple step-by-step guide to sketching the basic shape:
- Start by sketching a large oval for the body. This will be the base of our bunny's shape.
- Add a smaller oval for the head, connected to the body by a neck.
- Sketch a curved line for the back, making sure it's slightly tilted and gentle.
- Add two long, curved ears on either side of the head, making sure they're evenly spaced and angled.
Paying Attention to Proportions
When sketching the basic shape of your bunny, it's essential to pay attention to proportions. Here are a few tips to keep in mind:
- Make sure the head is in proportion to the body. A good rule of thumb is to make the head about one-quarter to one-third the size of the body.
- Pay attention to the size and placement of the ears. Make sure they're in proportion to the head and body.
- Keep in mind that the body should be roughly the same length as the back.
Step 2: Adding Facial Features
Now that we have the basic shape of our bunny, let's add some facial features to bring it to life. Here's a step-by-step guide to adding facial features:
- Sketch two small circles for the eyes, making sure they're evenly spaced and angled.
- Add a small, curved line for the nose, making sure it's in proportion to the head.
- Sketch a small, curved mouth with a subtle smile.
- Add some whiskers and a fluffy tail to complete the facial features.
Experimenting with Expressions
One of the best things about drawing an adorable bunny is experimenting with different expressions. Here are a few tips to keep in mind:
- Try using different facial expressions to convey emotion. A cute, smiling face is always a winner!
- Experiment with different shapes and sizes for the eyes and nose to create a unique look.
- Don't be afraid to add some personality to your bunny's facial features.
Step 3: Adding Details and Texture
Now that we have the basic shape and facial features of our bunny, let's add some details and texture to make it even more adorable. Here's a step-by-step guide to adding details and texture:
- Sketch some gentle, curved lines for the fur, making sure it's soft and fluffy.
- Add some subtle shading to create depth and dimension.
- Experiment with different textures, such as cotton balls or pom-poms, to create a soft, fuzzy effect.
- Add some sparkly eyes or a shiny nose to complete the details.
Experimenting with Colors
One of the best things about drawing an adorable bunny is experimenting with different colors. Here are a few tips to keep in mind:
- Try using a limited color palette to create a cohesive look.
- Experiment with different shades and tints to create depth and dimension.
- Don't be afraid to add some bright, bold colors to make your bunny stand out.
Step 4: Refining and Finishing
Now that we've added all the details and texture, it's time to refine and finish our adorable bunny. Here's a step-by-step guide to refining and finishing:
- Take a step back and evaluate your drawing. Make any necessary adjustments to proportions, placement, or details.
- Add some final shading and texture to create a soft, smooth effect.
- Experiment
Recent Post
Unlocking The Secrets Of Menopause: Expert Insights On Navigating Life After 40 With Paolo Tantoco
Tensions Rise As Trump Officials Defend Tariffs Amid Market Volatility And Warnings For Savers And Retirees
Rosie O'Donnell Teases Trump Move, Posts Disruptive Selfie From Abroad
Wings For The Win: Capitals Edge Ducks 7-4 In Thrilling Matchup
Ducks Fall Short: Key Takeaways From Thrilling 7-4 Loss To Capitals
Article Recommendations
- Patrick Fugit: A Talented Actor With A Diverse Career
- Unleash Your D&D Imagination: Discover The Goblin Cave's Hidden Treasures
- Love Life Of The "The Serpent" Star: Is Lee Ingleby Married?